Frequently in my work, I speak with multi-six and seven figure business that are running at full capacity, trying to build and scale their business but have yet to integrate any type of workflow systems.
The business owners KNOW what they need to do; however, they are often just not able to find the time to dedicate into strategizing and then developing the systems they need. They need more ActiveCampaign support to get started and up and running quickly.
And if fact, I’ve found that when they may have tried to elicit help from others, they then wind up disappointed and frustrated feeling no further along.
This is because it’s common to jump into developing systems without defining a high-level strategy and game plan. And when this happens, you are left with a mess of work, that ends up being more of a headache than helpful.
One of the reasons I became an ActiveCampaign Certified Consultant is because of the ease and simplicity of the system… It’s easy to design a workflow and then use ActiveCampaign as the tool to deploy it. Since ActiveCampaign integrates with a ton of other tools, workflow design and implementation is made easy.
Whether you are new to ActiveCampaign, or an existing user, I recommend working through the following ten steps to strategically set up your account for success… and not a headache.
10 Tips to Get ActiveCampaign Support on Your New Account
1. Set up Your Account
Before getting into campaigns or automations, make sure your account settings are all in order. This is important because specific settings will impact how ActiveCampaign functions for you.
All of the settings below should be review periodically to confirm accuracy, especially when it comes to your user accounts and addresses.
In order to access your ActiveCampaign settings, log in to your account, and then click on the settings cog.
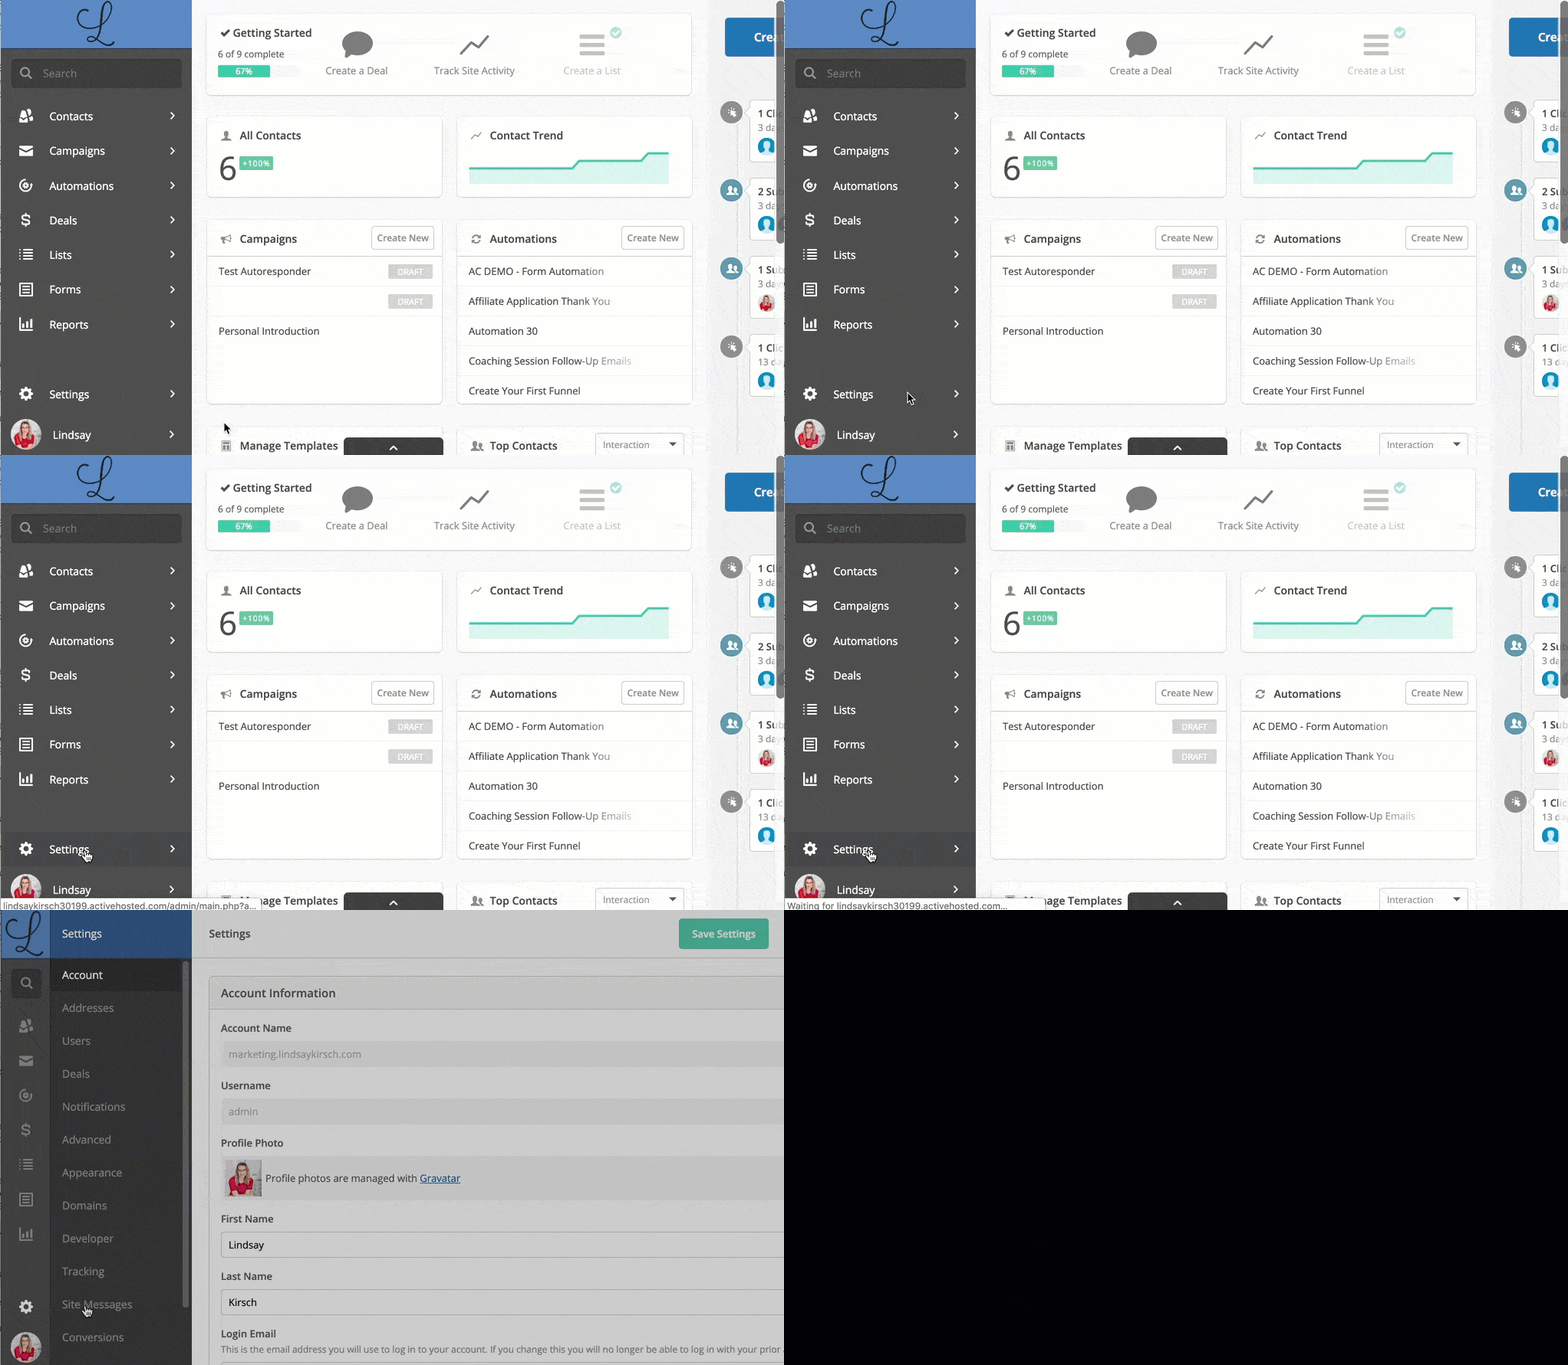
Verify:
- Your admin information such as your name and email (this is the default that will be used across your campaigns unless you change it).
- Your physical mailing address (this is the default address that will appear in your campaigns unless you provide a different one).
- Additional users and their access rights (it is especially important to add/remove users if you have had different users on your account).
- Branding and appearance; including your logos, headers, and footers, and removing the default ActiveCampaign logo.
For more information on basic account settings, check out Account Settings.
2. Add Site Tracking
ActiveCampaign’s site tracking allows you to track any contact activity and action that is happening across your website.
For example, site tracking will follow the footprint of a contact that opens an email, clicks on a link, reads and blog and then visits a sales page.
Site tracking is a powerful tool to that enables you to support your contact’s actions with relevant and time-sensitive follow-up.
Additionally, with site tracking you can monitor lead strength and how engaged a contact is on your website.
To install ActiveCampaign site tracking, you can either use a direct WordPress plugin or insert a code snippet into your website code.
Over time, site tracking will help you better support your contacts by providing the right information to them, at the right time.
For more information on site tracking, check out: A Guide To Site Tracking.
3. Create Your Lists
As you may have seen from some of my courses, I’m a strong advocate for pre-defining your marketing automation list strategy first, before beginning to build and send any email campaigns.
It’s far too often that people create an ad hoc strategy in their marketing automation system, without seeing the bigger game plan. Creating lists to fulfill a temporary need is ineffective and if not properly set up and managed, can negatively impact your email deliverability.
With ActiveCampaign, I believe that most businesses should only need three core lists. Any segmentation beyond that can be completed using tags and custom fields.
The three core lists include:
- Free content and other updates: used to share your regular content updates such as a blog, podcast, and other value-added, free content; segmented based on category or topic.
- Special offers and promotions: used for sharing any type of promotional offers or product and service sales; segmented based on the offer.
- Customer only communications: used to communicate with contacts that have purchased from you; segmented based on the product.
Bonus list (if you are using double opt-ins):
- Unconfirmed emails: using a process flow list; contacts enter until their email is confirmed, and then they move out into the other lists.
Using these lists allow you to keep your set-up simple, and allow your readers to pick and choose what they specifically want to receive from you. This prevents people from unsubscribing to all of your content rather than just a segment of it.
For more information on creating lists, check out this ActiveCampaign support article, A Beginner’s Guide to Lists.
4. Create a Tagging System
As with lists, creating a defined tagging system is also extremely important for maintaining an organized and efficient marketing automation system.
There is nothing worse, then wanting to send a campaign to a group of people, yet you can’t find who/where they are in your system.
…Or worse, you send a campaign to people that should not be receiving it.
As with your lists, before any ActiveCampaign implementation, create a clear tagging structure, and keep it consistent. I recommend using both the tag descriptions as well as performing a bi-annual tag assessment to review, update, and consolidate your tagging system.
For more information on tags, check out: What Are Tags?
5. Set Up Subscription Management
Once you have your lists ready to go, you want to allow your subscribers to be able to update and manage their subscriptions. By leveraging a subscription management page your contacts can pick and choose what communications they receive from you and when.
Note: this does not mean that people who unsubscribe from promotions will never receive promotional content. You can still cross-promote via your other list (for example, including an ad at the bottom of a blog share email) as long as you are keeping the list as the primary purpose.
Additionally, if you have set up your lists and tags properly, for each campaign you send, you can allow people to opt-out out of specific content, using an opt-out tag OR allow them to unsubscribe from an entire list.
This is particularly useful if you running promotion automation and want to encourage individual promotion opt-out of a single promotion versus unsubscribing to your entire promotional list.
This may sound like I’m encouraging an awful lot of opting out and unsubscribing… however, I’m a marketer that only wants my leads to see what they want, and I’m not trying to trick anyone or over-sell to anyone. One of the biggest mistakes I see with online influencers is the lack of a contact’s ability to pick and choose what communications they receive.
If you are unclear with your content promotion, and make it difficult for contacts to get what they want from you, they are more likely to unsubscribe or delete your emails.
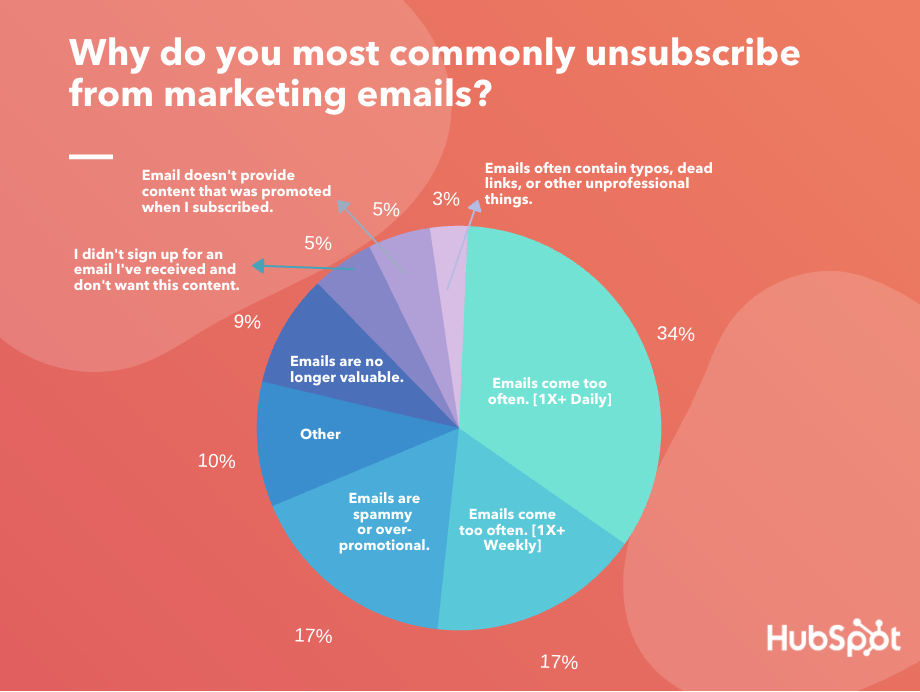
For more information on creating lists, check out: Managing Unsubscribes.
Read more: Subscription Management for Email Lists
6. Leverage Pre-Built Automations
All ActiveCampaign accounts come with a set of pre-built automations that are necessary for deploying an effective marketing automation system.
Just click and update your business information and voice to get started with these automations:
- Engagement tagging part I and part II: these automations will help you keep track of engaged and disengaged contacts. If someone if disengaged, you want to use a…
- Re-engagement campaign: this automation will help you reengage contacts that have disengaged, before removing them from your lists.
- Invite to follow on social media: this automation will invite engaged contacts to follow you on various social media platforms, enhancing their engagement.
To access these pre-built automations in ActiveCampaign, from automations, select new automation.
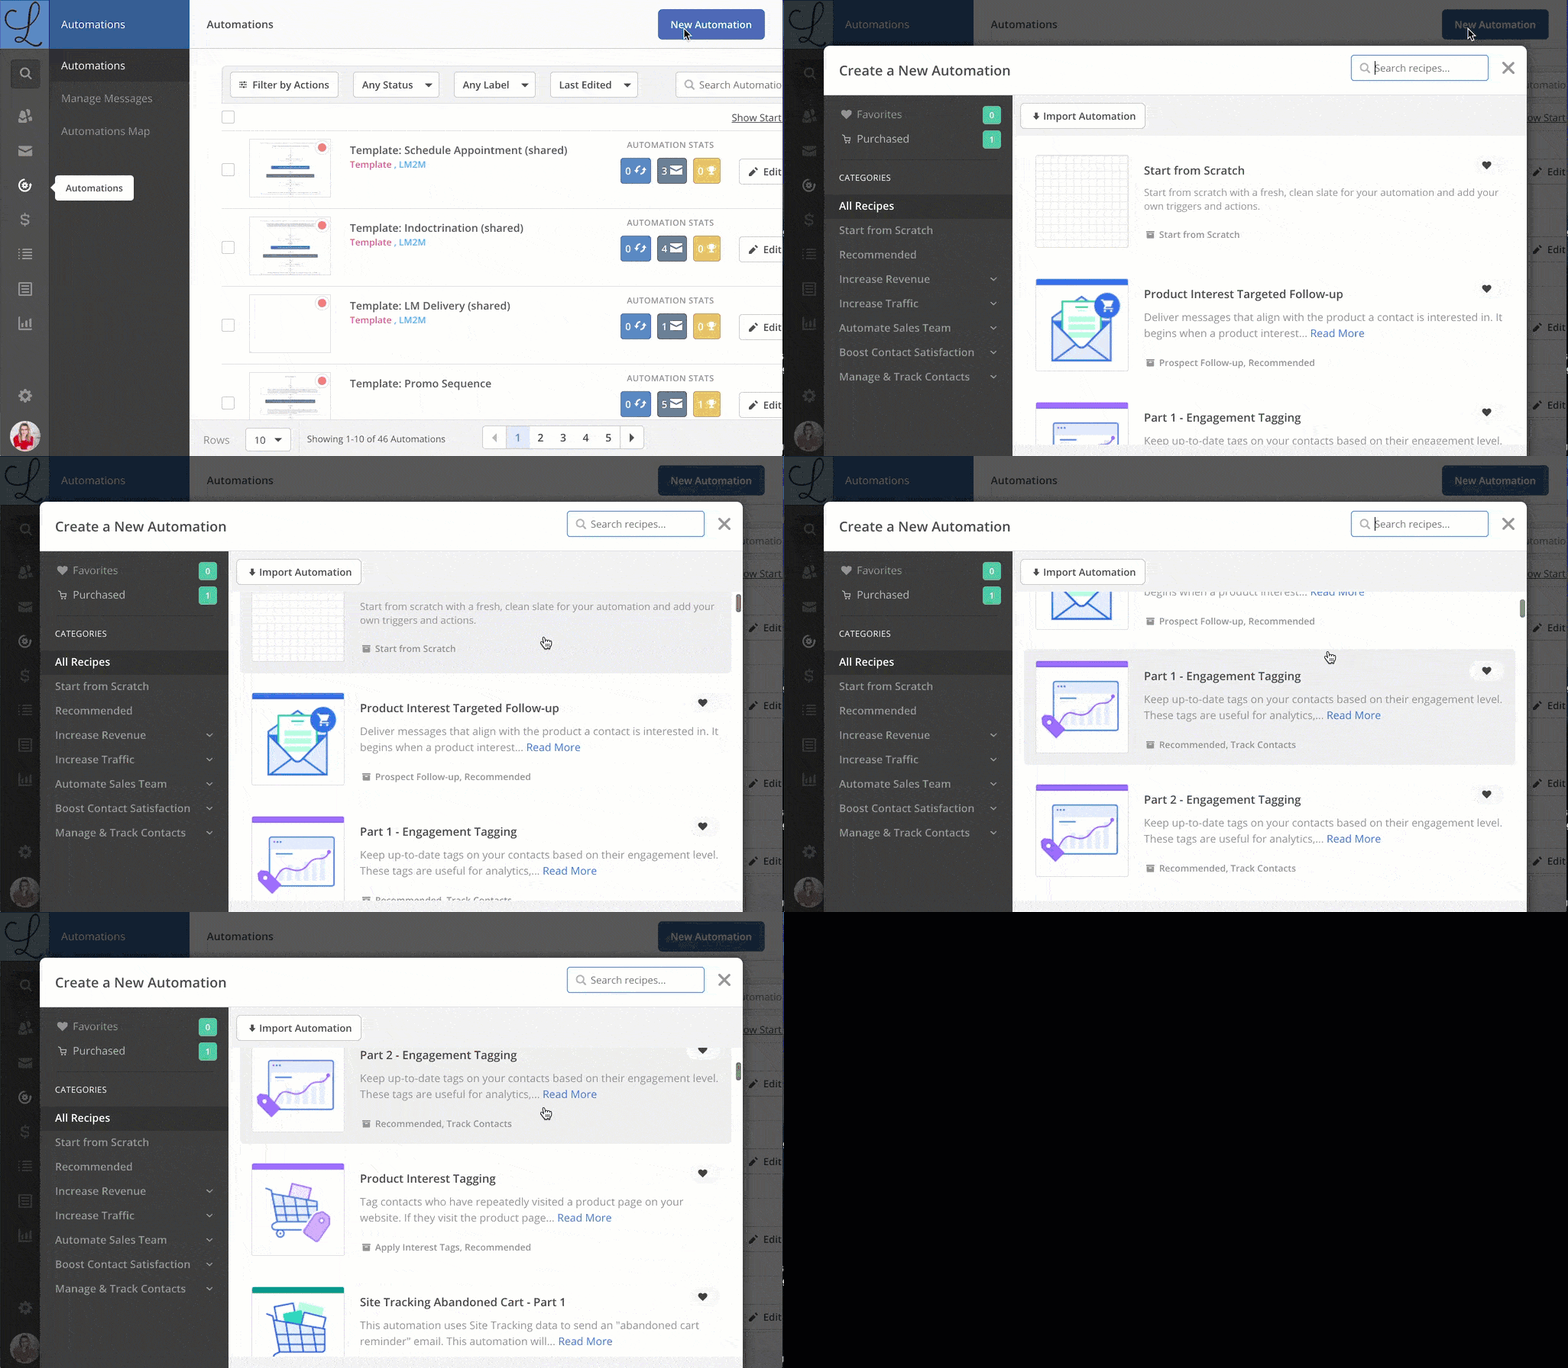
Leveraging this pre-built automation will help keep your list clean and organized, and increase your deliverability rates.
For additional, pre-built automations and workflows check out the ActiveCampaign Marketplace.
7. Leverage ActiveCampaign’s Free Migration Services
I’m not sure why, but it seems like most people are unaware of the ActiveCampaign support’s FREE migrations services.
Whether you have been working on a free tool such as MailChimp, or more complex one like HubSpot, ActiveCampaign can migrate your contacts, lists, campaigns, automations, templates, and forms directly into ActiveCampaign for you!
And believe me, I know from experience… ActiveCampaign’s stellar migration team can do this more quickly and easily than you can on your own.
Get started migrating with ActiveCampaign’s FREE migration services.
8. Request a Free Campaign Template Design
Another little-known fact is that ActiveCampaign also has a free campaign design service. They will take your logo and brand colors and implement it into a campaign template that you can use over and over again.
While there is a free design level with all plans, enterprise levels will get more advanced design options.
Furthermore, ActiveCampaign comes with a library of templates that you can further customize on your own.
For more information, check out ActiveCampaign’s free design services.
9. Build Your Opt-In
One of the final steps to get up and running with ActiveCampaign is to build your first opt-in form. This form will allow contacts to subscribe to your various lists or purchase products and services from you.
ActiveCampaign has made setting up sign up forms really easy with templates, and once you have your lists and tags set up you will know directly where to put your contacts.
If you are looking for a more customized sign up forms (such as a site ribbon, lightbox or other types of opt-in) check out Thrive Leads – it integrates very nicely with ActiveCampaign.
For more information on how to set up sign up forms, check out Signup forms.
Read more: Build a Better Email Welcome Series
10. ActiveCampaign Support
Last but not least, if you are just getting started with ActiveCampaign, get support directly from ActiveCampaign and save yourself time (and a headache).
ActiveCampaign support has three options:
Live Chat: available during standard business hours, by clicking the help button in the bottom right of your account window.
Support Email: also available by clicking the help button in the bottom of your account window, or via this website.
1-1 Call: MY FAVORITE! ActiveCampaign will get on a Zoom call with you and walk through your issue, 1-1! This includes screen sharing and a recording if needed. Calls must be scheduled in advance.
For more information on all of the ActiveCampaign’s support options, check out ActiveCampaign Support.
KISS Your Workflows!
(Keep it simple silly!)
Your workflows and systems should work with you and provide your business with relief and opportunity to develop your front-end client work, rather than creating additional stress.
Over-complicated systems that require constant maintenance or a manual to decipher them are not helping your business… they are just another obstacle to your success.
For more information on ActiveCampaign, check out my ActiveCampaign Certified Consultant page, or let’s chat!

